Common Problems
Troubleshooting Assignment Submission Problems
If you are experiencing technical difficulties when submitting assignments in your Blackboard course, please review these tips and resources.
Resolving Common Problems
If you are having trouble attaching and submitting a file, do the following to troubleshoot common issues:
- Check your file to verify that: it has a file extension; it is not a ~$ temp file; and the file's size is under 250 MB.
- Before you submit the assignment in Blackboard, make sure that you have saved your file and exited the program used to create the file.
- Use a supported computer and web browser and use the Browser Tester to check your browser's settings. If one browser does not work, try using a different browser to submit your assignment.
- Clear your browser's cache of temporary files.
- Temporarily disable browser add-ons inMozilla Firefox, Google Chrome, or Safari if you are being prompted by pop-up error message alerts or ads, or if browser activity slows and crashes.
Error Messages about File Format
 If you experience error messages refering to your file's format, check your file to make sure it has the following characteristics and make
corrections where necessary:
If you experience error messages refering to your file's format, check your file to make sure it has the following characteristics and make
corrections where necessary:
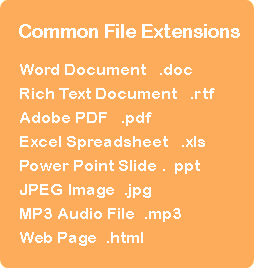
- Does your file have a file extension assigned to it? (Example: .rtf, .doc, .html). If it does not, try renaming your file to include a file extension.
- Does your file's name follow accepted naming conventions? File names must not contain blank spaces or special characters and must be less than 72 alphanumeric characters in length.
"Access Denied" Error Message When Trying to Submit an Assignment
Blackboard cannot upload any individual file larger than 250 MB. If your file is larger than 250 MB, you must reduce the file's size or consider alternate means of delivering the file to your instructor.
Reduce File Size by Optimizing your Document for the Web
- Optimizing MS Office Files - Word, PowerPoint, and Excel
- Optimizing PDF Documents
- Optimizing Photoshop Files
- Optimizing Photos
Compress Your File in a ZIP Folder
Sending your file (or multiple files) to a zip folder will reduce the file’s size considerably through compression. Compressed files take up less storage space and can be transferred to other computers more quickly than uncompressed files. The zip compression process does not change the quality or nature of the file.
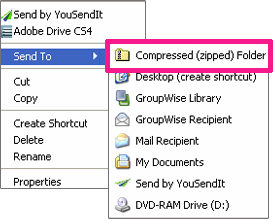 To create a zip folder, simply right-click your mouse on the file name or file icon you want to compress. A context menu will appear. Roll your mouse over the "Send To" option and click the "Compressed (zipped) Folder" link from the second context menu that appears. A "compressing" window will appear and show you the progress of the files compression into the zip folder.
When the compression is complete, you will see a newly created zip folder with the name of your file (Example: my_assignment1.zip). Try submitting this compressed zip folder as your assignment file.
File Upload Failure Error
If you experience this error message, please use a different web browser such as Mozilla Firefox or Google Chrome. File uploads will be successful in Blackboard when using one of these browsers.
Document Preview Not Working
When a supported document type is submitted, the assignment tool should display a preview of the file within the Bb Annotate Viewer. This is a document preview tool that creates an approximation of an original document’s format, fonts, and layout. It supports documents created with Microsoft® Word (DOC, DOCX), Microsoft® PowerPoint®(PPT, PPTX), Microsoft® Excel®(XLS, XLSM, XLSX), Adobe Acrobat (PDF), and OpenOffice® (ODS, ODT, ODP). It also supports common digital images files (JPEG, JPG, PNG, TIF, TIFF, TGA, BMP) and medical image files (DICOM, DICM, DCM). Other supported files include RTF, TXT, WPD, and PSD.
If a file conversion message appears, click your browser's refresh button or push F5 on your keyboard to refresh the page. After the page refreshes, the previewed document should appear.
Instructor Can't Open a Submitted File
If your instructor can't open your file, please check your file to ensure that it is not a ~$ temp file and that the file has a valid extension. If you can open the file on your computer, save the file using a different name and send the new file to the instructor.
If you have created your file using Apple Pages, Open Office, or Google Docs, make sure you have saved or exported the file in a format that can be opened by the instructor, such as a Word .docx or .rtf file.