Planetarium software programs let you mimic the sky in a virtual environment.
I suggest you obtain Stellarium but you may use any other program you may already be familiar with.
If you do this assignment under the "early bird special", you do NOT have to do research topic #1. See the announcements folder in Blackboard for details about the early bird special. It is really a pretty good deal. Also, if you take advantage of the early bird special, you can still do research topic #1 for extra credit.
Your assignment is to familiarize yourself with ANY planetarium software program. There are several on the market for cost, but I suggest you download and use any FREE program. I like one called Stellarium. Of course, you will need to have access to a computer with the minimum system requirements as well as permission to load software on it. If that is a problem for you, we now have a version full desktop version of Stellarium on the MATC NetLab system (details to access this are in a separate folder).
Step 1 - Obtain the software (click here to get Stellarium for Windows and Apple products) and install it on your computer. Note: Apple products use the macOS and there are several versions for Windows. If you still have Windows 7 there is a version for that old OS (go to the control panel and look in System). Most newer PCs have Windows 10 or 11 installed. To check if you have ARM64 or x64 (Intel/AMD), open your Windows Control Panel, go to System, and click About. Under "Device specifications" and "System type," it will state either "x64-based processor" or "ARM-based processor"
Once you know which version matches your system, click on the appropriate icon and it will be automatically downloaded. Once it is saved, run the downloaded file and the install will take place. Apple users may experience a problem at first but watch this video if it doesn't load for you. Note: There are other download sites ... do NOT use them! They will ask you to install drivers that are not necessary and I have no idea what they might do to your computer. If you have any questions about the installation, please contact me.
If you have successfully installed Stellarium on your computer, skip to Step 2.
Can't install the desktop version on your computer? No problem, there is a full desktop version of Stellarium installed on the MATC NetLab system (details to access this are in a separate folder). This is your best option if you own a Chromebook computer.
Other options ....
Do you only have an iPad or Android tablet? First master the menus in the free web based version. Then go to the Apple Store or Android Play Store and get Stellarium Plus (they want $2 / month or $20 for a lifetime license, but you get a free week trial). It looks like the web based version but has more features (like change the atmosphere to adjust for light pollution, more lines to draw in the sky, etc.). This is still not as good as the desktop version but it certainly will allow you to do everything I cover in the desktop version ... only the menus look different. You are responsible to learn every feature of this version. I don't have it myself.
In Stellarium Plus, small differences from the web based version are:
Do you have a Chromebook computer? Some computers (like Chromebooks) will not let you install software on it. You need to use the desktop version of Stellarium on the MATC NetLab system (details to access this are in a separate folder).
Step 2 - Run the software for the first time and familiarize yourself with the menu options.
I've made a short video (in .mp4 format) that gives a brief overview of the downloaded desktop (v 0.18.3) or NetLab version - Video Tutorial (please watch this)
Stellarium will tell you what the icons do if you mouse over them. Play around and have some fun. If you get too messed up, just close the program and re-open to the default settings. You close Stellarium using the "power icon" on the far right of the bottom menu.
As you are learning the program, please take notes. They are allowed on the evaluation and it makes it so much easier because you do not have to memorize anything.
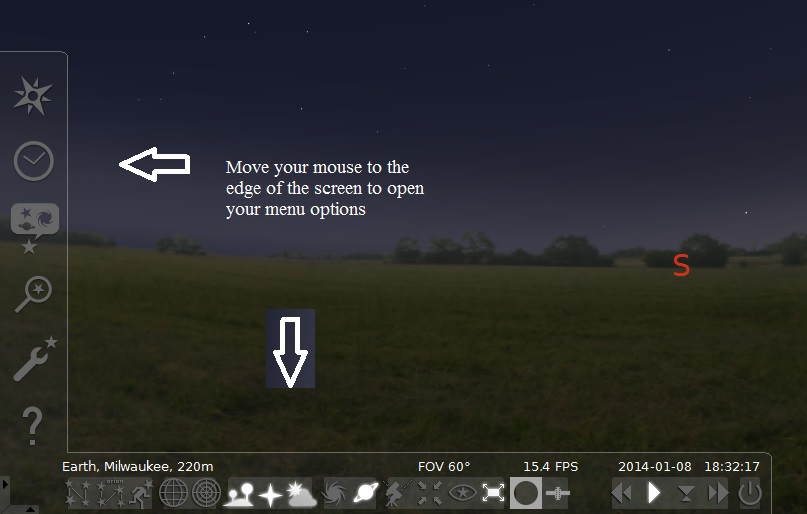
Menus for Stellarium are found along the left and bottom (point there with mouse)
Step 3 - Simple Stuff Please be able to set and change:
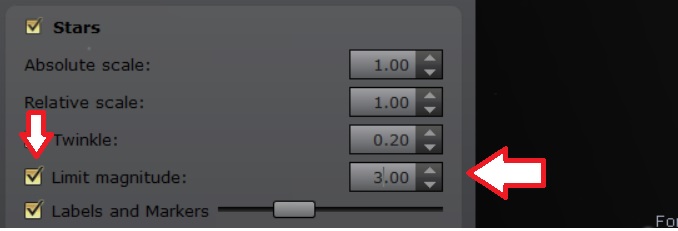
Step 4 - A bit harder Change what appears on the screen
Let's see how good you are. Can you now set your location to Seattle, WA at 2 pm on 4/7/2005 .... looking north with the meridian line and stars visible?
Step 5 - Getting Fancier
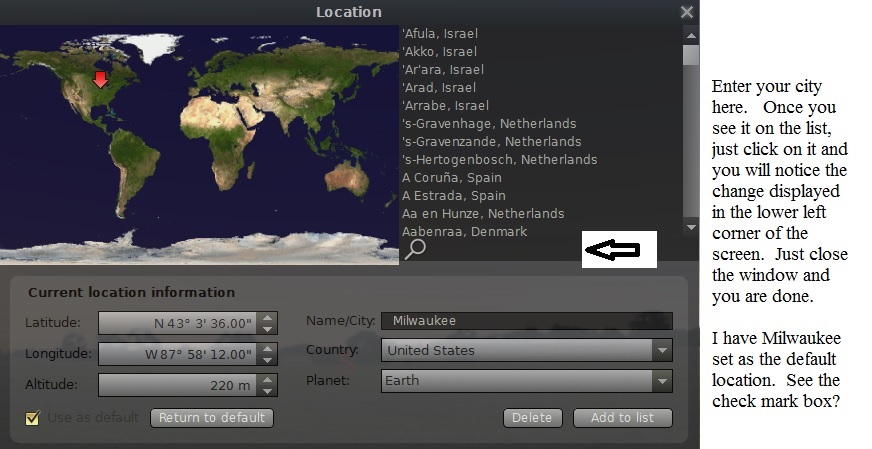
Can you set your location to Milwaukee at the current date and time, looking at Jupiter (with name displayed)? Are you taking notes?
Step 6 - Flying through time
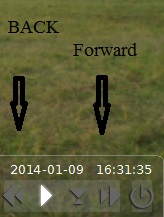
 This is the menu option that
locks a selected object at the center of the screen.
This is the menu option that
locks a selected object at the center of the screen. Try These Exercises
Practice Exercise #1 (don't forget to take notes)
Go to Tampa, Florida using the system date and time. Search for the north star (Polaris). Zoom in or out so you see both the horizon and Polaris. Move forward in time so an hour moves forward in about 4 seconds. Add in the constellation lines as well as their names. As you watch the sky spin, name the constellations that never leave the local horizon. Now go to Milwaukee, WI and zoom out so you can see the horizon. Answer the same question about the constellations.
Practice Exercise #2
Use the Search feature to find the sun. If (at any time) the sun is below the horizon, remove the ground. Track the sun so it is displayed in the center of the screen and remains there. Remove the atmosphere (so the stars are visible). Display the ecliptic (of date) - a line that traces the path of the sun. Display the constellations lines and their names. Now advance time a day at a time. Hint: There are a couple ways to do this, but I'll let you try this on your own. You should see the sun change its position with respect to the background stars as it moves along the ecliptic. Turn "off" the track feature and advance by one day at a time. Now the stars remain fixed and you see the sun move along the ecliptic (to the left .... or east).
Practice Exercise #3
Go to Casper, WY USA on 8/21/2017 @ 10:30 a.m. (central
time ... remember that this will actually be 9:30 am mountain time)
Search for the sun (so it is centered on the screen) and set to track it.
Zoom in until the disk of the sun is about the size of golf ball
Run time forward …. slowly .... until you see something interesting happening. Then
slow the animation down to real time.
You just watched a total solar eclipse.
Step 7 - Extra credit.
Quite simply, show me you have discovered more features about the program than I have listed above. Trust me, there are a lot of features to discover. For example, you have the ability to observe from places other than the surface of Earth. You can observe the solar system from above and watch the planets whirl around the sun. In Stellarium, you can even write scripts that run like a movie. The more you can impress me, the more points you will get.
Step 8 - Contact me (by email or text) when you feel comfortable with these features. Give me a couple of exact days/times you have open and hopefully one will work for me as well.
I evaluate you in a video conference using the program. Currently I'm using the Google Meet video conferencing software. I've tested it with several browsers - Chrome, Microsoft Edge, and Apple Safari. We start by having you call my cell phone at the appointment time. I'll talk you through the rest but basically I will email you an invite to your MATC student email account and you click on it. It takes only about a half hour to do the evaluation. I'll ask you to do about 10 things that were already covered in the assignment. You do NOT need a web cam on your computer since you will be sharing your screen with me. Please feel free to use your notes.
Don't feel intimidated. If you are having problems we can try again at a later time. I will ask you to repeat tasks similar to the exercises listed above.
Step 9 - In unit 1, I've made a discussion topic called "Super Stellarium Users". It requires you to go beyond this handout. If, after you do the 100 point evaluation, you might want to challenge yourself for extra credit.
A Side Note - Stellarium Mobile (but please do NOT use this version for evaluation purposes)
For a couple of bucks I purchased the smartphone Stellarium App. It is cool for finding things in the night sky. It is slightly better than the free Google Sky Map App.
Here is my review of version 1.13.3.
Pros
The menus are very similar to the desktop version. Once familiar with that, you will have no problems navigating the mobile version. Start by touching the "layers" icon (in bottom left). Add/remove constellations, grids, ground, atmosphere. etc. Hit the menu icon (upper left) and then Settings. You can change your location or whether or not to use the sensors to auto-track or not. I mastered everything in 5 minutes.
If you open the app during the daytime, it automatically advances time to your night sky later in the evening. You can override this.
The mobile version has the ability to use your phone as a pointer (sensors ON mode). That is, as you move the phone around at the sky, it shows you what you are looking at. This is similar to the (free) Google Sky Map. This is very helpful to identify constellations, planets, etc.
The search feature in the upper right (looks like a magnifying glass) is sharp. Type an object and it tells you where to move the phone to see it. Great zoom feature.
When you touch the date/time info in the lower right, the screen allows you to advance/rewind time. Very cool.
Cons
Not free! Ok, a couple of bucks won't kill anyone but I like free. I don't regret purchasing it.
No help menu. You better be good at "fiddling around" to figure things out.
Not as powerful as the desktop version. The mobile version lacks many features that I will want you to learn. So you will still need to learn the desktop version and you probably should learn it before you purchase this mobile app. Here is a short list of things the mobile version lacks: