The first telescope used for astronomy was fashioned by Galileo in 1609. Ever since, telescopes have gotten bigger, better, and more expensive. We start this section discussing the telescopes used by amateurs and end this unit covering the "big boys" used by professionals.
For all practical purposes, non-professional telescopes fall into 3 categories:
Refractors - which collect light with a lens
Reflectors - which collect light with a curved mirror
Schmidt-Cassegrain Scopes - which collect light with a curved mirror, but has a correcting lens as well
A refracting telescope can be constructed quite simply. To make one, all you need is two convex (converging) lenses. It is so simple, I'm amazed that it wasn't invented until the early17th century (the art of glass making has been around for thousands of years before that). One lens collects the light, which is generically known as the objective (a mirror can do the same thing), ... another lens acts as the eyepiece. When parallel rays of light enter a converging lens, it draws all the light paths to a point known as the focal point. The distance between the objective lens and the focal point is known as the focal length. After that, the rays begin to diverge, where the eyepiece converts the light rays back to parallel lines. See the images below.
A converging lens
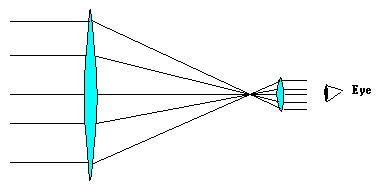

A refracting telescope
Because most refracting telescopes have a rather small diameter lens, they do not collect very much light, therefore, these telescopes are generally only good for viewing inherently bright objects like the moon and planets. They also tend to be very expensive when compared to the telescopes which use a mirror to collect the light. They do look impressive in the study or parlor, but I would not recommend getting this kind of telescope. If you insist on having a lens for an objective, I suggest you purchase binoculars (7x50), ... preferably one that can be mounted on a tripod.
A mirror polished to a parabolic shape will do the same thing a lens does, ... converge light to a single focal point. But mirrors are a lot cheaper to make than lenses (and have other advantages as well ...see class discussion). Therefore, the most practical telescope to purchase uses a mirror as an objective (light collector) and are known as reflecting telescopes.
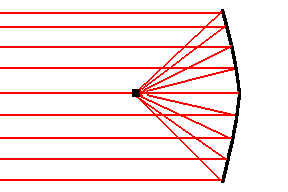
A parabolic mirror will also focus light.
A design developed by Isaac Newton places a small diagonal mirror near the top of the telescope whose job is to divert the rays to the side. These scopes are very common and are known as Newtonian reflecting telescopes.
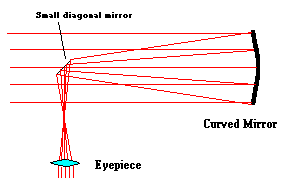
A Newtonian Reflector - Notice the eyepiece near the top of the tube.
Serious amateurs who have a few thousand dollars to spend may opt for a popular hybrid telescope - the Schmidt -Cassegrain telescope. These scopes use a spherical mirror (not parabolic) which is much easier to manufacture, but requires a correcting plate lens in front to bring the rays to a single focus.
Notice the correcting plate in front and the eyepiece in the back in this image.
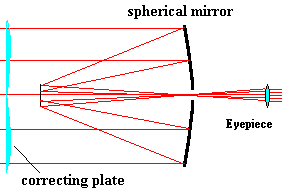
The Cassegrain Focus
Technically, a Schmidt-Cassegrain telescope falls under a broader category known as Catadioptric Telescopes. This is because there is another (less popular) hybrid scope known as the Maksutov-Cassegrain also uses a spherical mirror and correcting plate.
Whenever I show a large telescope to a group of people, someone will ask me how powerful it is. I usually just smile and say, "I don't know yet". In most cases, the person is really asking is, "What is the magnification of this telescope"? The magnifying power of a telescope depends on two factors, the focal length of the objective and the focal length of the eyepiece. The mirror (or lens) used to collect light will have a fixed focal length and is usually stamped on the scope itself. The eyepieces are interchangeable and come in a variety of focal lengths. The formula for magnifying power (M) is:

where fo is the focal length of the objective (light collector) and fe is the focal length of the eyepiece. Placing a 25 mm focal length eyepiece into a telescope with a 1000 mm focal length mirror will yield 40x in magnification. Notice that this formula does not depend on the diameter of the objective, ... only its focal length. Can you also see why I give my cryptic answer when I display a telescope that doesn't have any eyepiece mounted in it?
There are two other "powers" to a telescope that do depend on the diameter of the objective. They are:
Light collecting power
Resolving power
The bigger the mirror (or lens), ... the more light you can collect, ... the brighter the image. When comparing a 4" diameter objective with an 8" diameter objective, you don't get just twice the amount of light, ... you get 4 times the amount of light. This is one reason why larger diameter mirrors are preferred. The other advantage deals with resolution. Resolution is related to the clarity of an image, how much detail you can make out, and/or how "in focus" the image appears. Anyone with glasses can tell you that you can see much better with them on versus when you are not wearing them. Another way of saying the same thing is, glasses improve your resolving power. Technically, resolution is related to the angular separation required to distinguish two separate light sources. That is, when someone says that the resolution of the human eye is only about 1/60 of a degree (1 arc minute), that means if two distinct light sources were separated by this small angle, the average human eye could just barely distinguish it as such. Any smaller angle and you would see them as one single light source. In theory, the resolution limit (for telescopes and the eye) is a function of the diameter of the objective (D) and the wavelength of the radiation it is attempting to measure (λ).
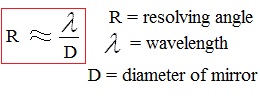 .... the smaller the value for R, the sharper the image.
As the diameter of the light collector (D) increases, the resolving angle gets smaller (you can see better). Basically what this means is, the bigger the light bucket, the brighter and crisper the image.
Astronomers crave telescopes with larger apertures (diameter of objective) because it improves both the brightness and resolution of the image. A bigger mirror does not change the magnification (unless the focal length changes). In fact, magnification is generally the least significant "power" a telescope can offer. Most observers actually use the eyepiece which offers the lowest magnification. This will make the image brighter since the light is concentrated in a smaller area.
Our atmosphere is sometimes an astronomer's worst enemy. The light from distant objects travel virtually unhindered towards us, only to be scrambled as it passes through our thin atmosphere. On nights when the air is extremely steady and with little temperature contrasts between vertical layers, the atmosphere offers the best viewing opportunities. Astronomers refer to this as good "seeing" ... because it offers better resolution. Other nights the atmosphere is less cooperative ... making observations almost impossible. As you will soon see, there is something astronomers can do about this situation, ... but only at the professional level. Amateurs can only complain.
|
Good "seeing" |
Poor "seeing" |
There are basically 2 ways to mount the frame of a telescope.
This is basically a tripod. It allows the telescope to move up-down (altitude) and left-right (azimuth). It is also one of the cheapest mounts.
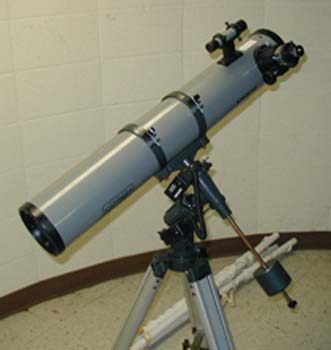
A refracting telescope on a cheap altitude-azimuth mount
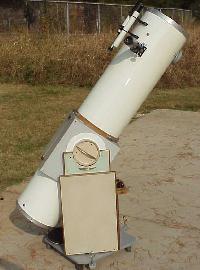
A version of the altitude-azimuth mount is known as the Dobsonian mount. The telescope basically sits in a box or cradle.
A Newtonian reflector on a Dobsonian mount
Another version of the same style is the altitude-azimuth fork mount which is shown below.
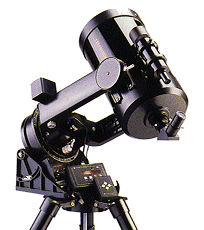
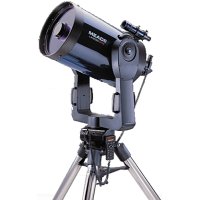
A Schmidt-Cassegrain scope on a fork altitude-azimuth mount.
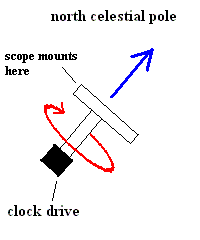
Better telescopes are equipped with equatorial mounts. The advantage of this type of mount stems from the fact that the rotation of Earth must always be taken into account when using a telescope. In the first unit you saw that all celestial objects make diurnal tracks across the sky over time (circles around Polaris). A telescope mounted on an altitude-azimuth mount needs constant adjustments in both axis (up-down and also left-right). By giving this system just the right tilt and set-up, you only need to adjust one axis to compensate for the earth's rotation. Equatorial mount always have one axis tilted to the observer's latitude (Milwaukee is 43 degrees). This same axis is then aligned to the celestial pole. Most equatorial mounts come with a clock drive mechanism, which automatically turns the scope to keep your target in the field of view.
|
Refractor on an equatorial mount. |
Newtonian reflector on an equatorial mount. |
A SC on an equatorial fork mount. |
High end models now are equipped with computerized chips and GPS systems built in, ... making set-up a snap. To find astronomical objects, you simply enter the object in a keypad and motors on the scope slew to the desired object for you. You can even link these telescopes to a laptop computer. Many popular planetarium programs for the computer recognize these newer telescopes and allow you to drive the scope from the computer.
A built-in computer and motors on both axis help you find things fast.
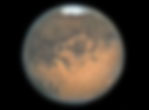
Your smartphone has a digital camera (or if you own a digital camera) ... thank an astronomer. Many amateurs enjoy taking pictures through their telescopes. For the professionals, it is a necessity. Although using standard photographic film is possible, astronomers have always found that the low light levels of many of their subjects required extremely long exposure times. This is because standard photographic film is inherently very inefficient, capturing only about 1% of the available photons in a photochemical reaction. But there is a better way. Capture the photons electronically using an early form of digital camera known as a CCD imager. Once, these devices cost a fortune and only professional astronomers could afford them. Now, multi mega-pixel digital cameras cost around a hundred bucks.
There are quite a few web pages where amateurs show off their astronomical pictures taken with CCD imagers. Below are just a few:
Enrico Prosperi's web page - click here
Walter Koprolin's web page - click here
The best part of all these advances in astronomical equipment is that each year, the products keep getting better and the costs keep getting lower. For under $10,000, you can essentially have an observatory in your backyard. However, my suggestion to you is to join a local astronomy club. For just a few dollars in membership dues you will have access to thousands of dollars in equipment and the help of club members to use it properly.
©Jim Mihal 2004, 2014, 2022 - all rights reserved